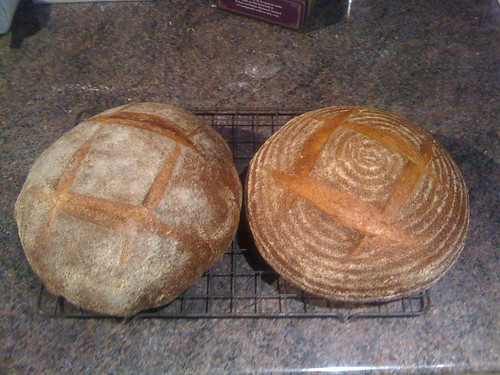
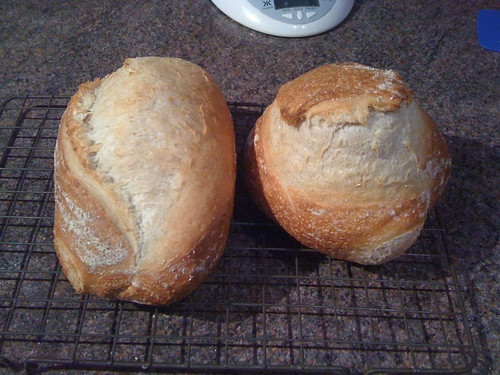
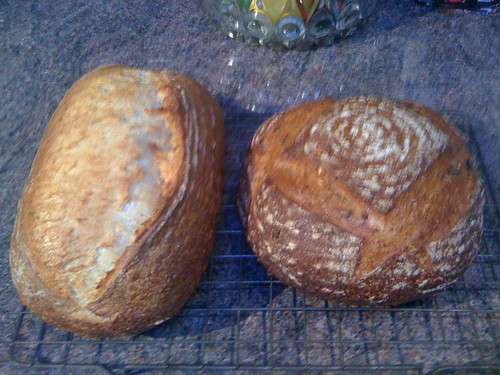
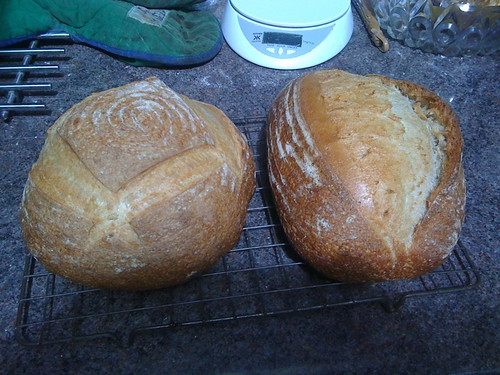
Two loaves
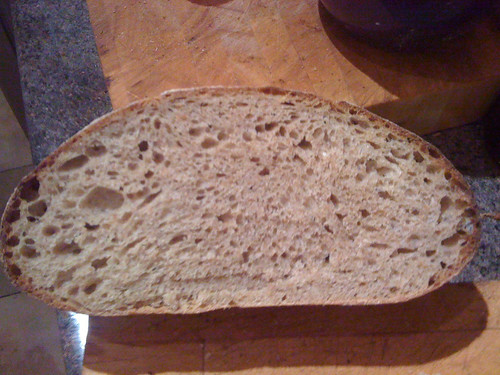
Just a picture of a couple of loaves to show how my quest for quality and consistency is going. This bread is absolutely fantastic. Wonderful flavour, wonderful texture, the closest I've come to bread perfection. Crumb shot And here's a picture of the crumb, so you can see how wonderfully light and airy it is. Now that I've got the wholemeal down, I'll start trying to get the white bread sorted.Thursday 22 December 2011
Thursday 1 December 2011
Baking masterclass
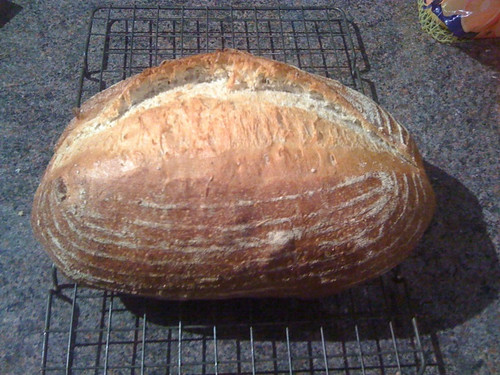
Since I had my masterclass with Theresa and Ice over on Northwest Sourdough, my baking has gone from strength to strength.
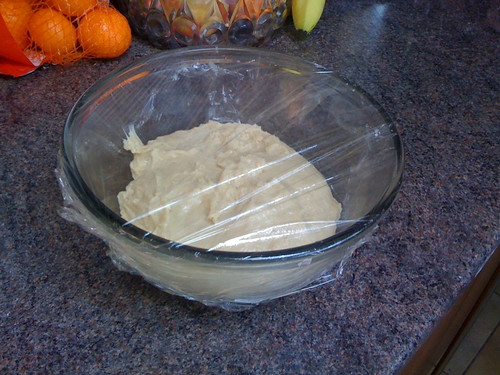
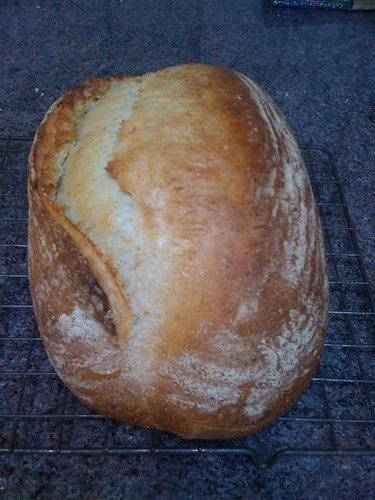
My daily loaf is what I call 'Another Place Miche', but it's based largely on a recipe by queen of the online miches, Shiou-Ping. My loaf is based upon her Gerard Rubaud miche, with some minor adjustments. I substitute 100 grams of her white flour with 100 grams of Waitrose's extra-strong wholemeal flour, so the loaf is now approximately 50% white flour, 45% wholewheat, and the other 5% being a mixture of spelt and rye. Hydration is 67%.
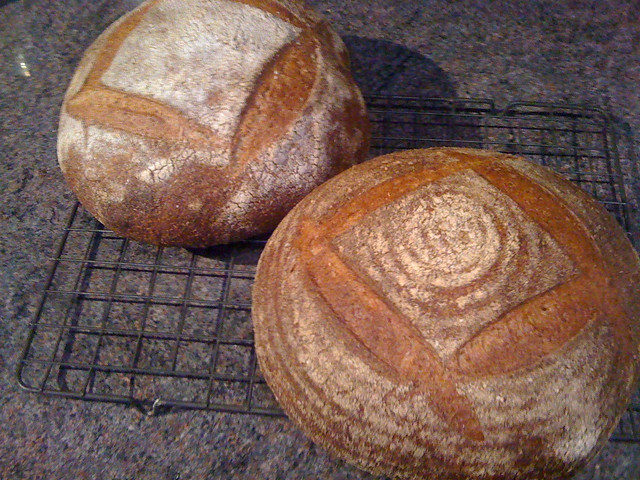
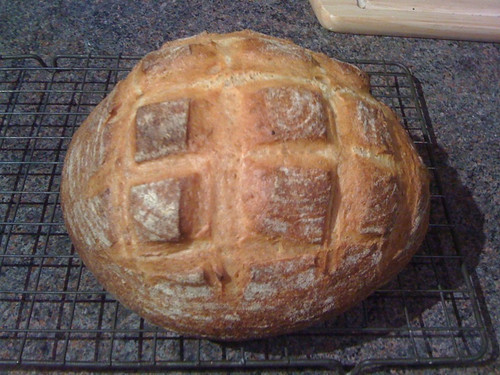
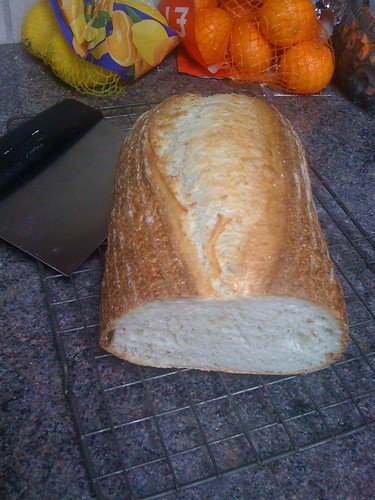
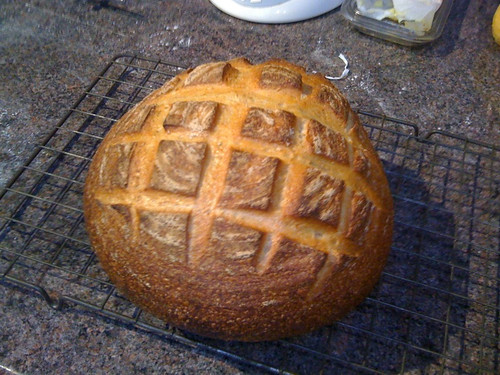
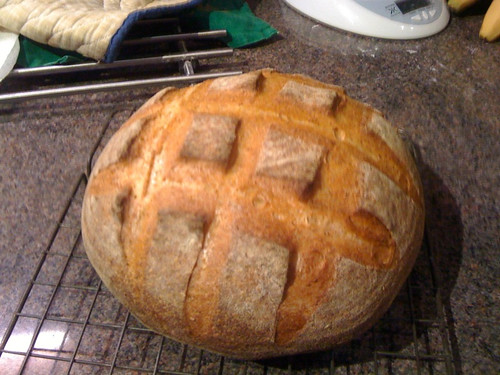
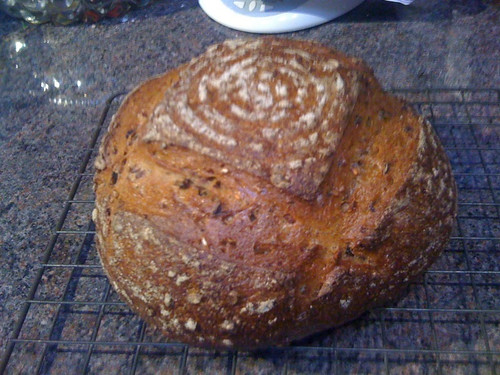
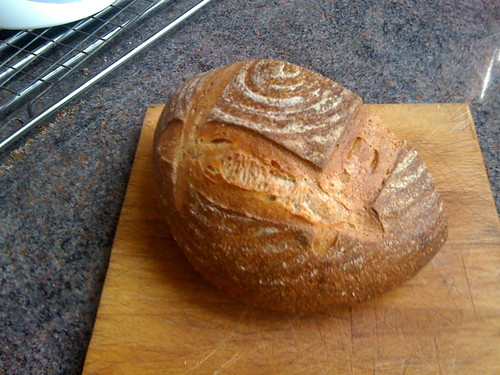
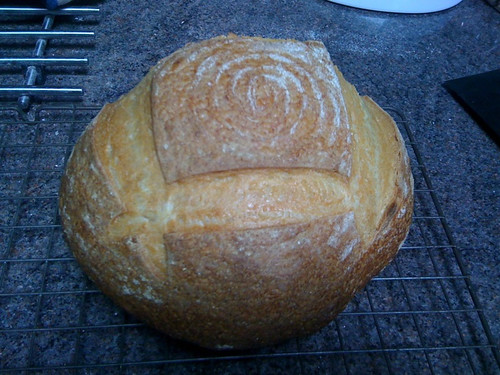
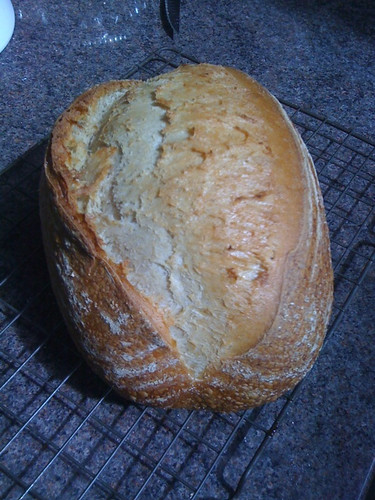
Here are a couple I knocked up this week. Nothing special -- they're pretty well this good every time I bake one now. I've just about got it down.
Perhaps I'll submit them to Yeastspotting this week. I think they're good enough.
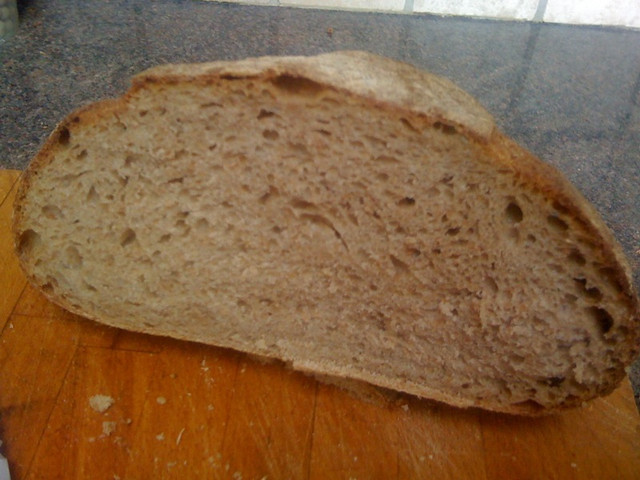
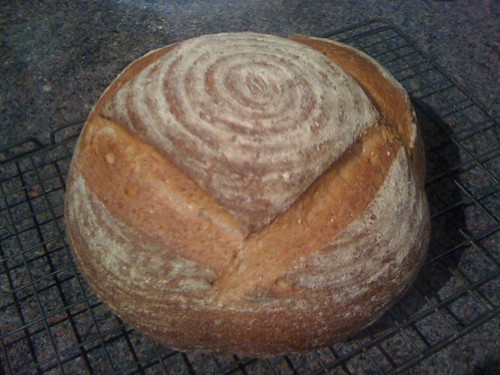
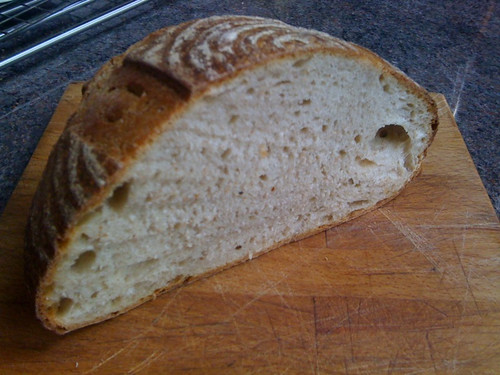
And the crumb:
Recipe:
Stage 1
6 grams starter
8 grams water
14 grams flour (2 grams wholewheat, 1 gram spelt, 1 gram rye, 10 grams strong white bread flour)
First stage takes anywhere from 6 to 16 hours to double in size and become nicely aerated. I tend to go for about 12 hours.
Stage 2
28 grams starter (from stage 1 --alternately, from stage 3.)
16 grams water
30 grams flour (5 grams wholewheat, 3 grams spelt, 1 gram rye, 21 grams strong white bread flour)
Stage 3 (for a single loaf)
74 grams starter (from stage 2)
28 grams water (if doubling quantities, use 64 grams water)
50 grams flour (9 grams wholewheat, 5 grams spelt, 2 grams rye, 34 grams strong white flour.)
(If doubling quantities, I use 64 grams water, 20 grams wholewheat flour, 10 grams spelt, 4 grams rye, 80 grams of strong white bread flour.)
Whether you're making one loaf or two, you wamt to have 28 grams of starter left over so that you can use it as your stage 2 starter for your next loaf. Before you're ready to bake, take off 28 grams and put it in a container. Leave it on your conntertop, or pop into the fridge.
Mix the 115 grams starter from stage3 into 312 grams of warm water. Add 190 grams of wholemeal flour, 40 grams of spelt and 14 grams of rye. Mix thoroughly, cover, and allow to stand for an hour or two.
After two hours, add 8 grams ground sea salt and 222 grams strong white bread flour and knead your dough for around 10 mins.
Oil a bowl pop your dough in and cover for an hour. After an hour, stretch and fold, and then back into the bowl for another hour. After the second hour, stretch and fold the dough then back into the bowl and cover again.
Wait until the dough has doubled in volume. At the moment, with kitchen temp at about 18 degrees c, that's taking about four or five hours from mixing the dough.
When the dough has doubled in volume, get it out and shape into a boule, then pop it into a lined bowl or banneton amd wait until the dough has doubled in size again.
Pre-heat the oven for half an hour (or more, depending on the size of your oven stone. At the moment, I'm using a pizza stone which does fine.) My oven is a fan assisted oven, and I heat it at the max,. 245 c.
Slash the top of your dough -- I use the classic hash slash -- pop it onto your oven stone, liberally apply steam to your oven using whatever method you prefer (I use a combo oven dish filled with a cup of boiling water, and spritzes of water every two mins for the first 8 mins.
For a single loaf, I bake for 10 minutes at 245 c, then turn down to 235 c for an additional 10 mins. Then, I turn down to 200 for the last 10 mins, upending the loaf 5 minutes before it's due to come out to make sure the loaf is evenly browned on the bottom.
After 30 mins, I rap the bottom to make sure it sounds hollow. If it doesn't, give it an additional 5 minutes, but usually it's fine after 20 mins.
Put it on a cooling rack and let it cool.
My daily loaf is what I call 'Another Place Miche', but it's based largely on a recipe by queen of the online miches, Shiou-Ping. My loaf is based upon her Gerard Rubaud miche, with some minor adjustments. I substitute 100 grams of her white flour with 100 grams of Waitrose's extra-strong wholemeal flour, so the loaf is now approximately 50% white flour, 45% wholewheat, and the other 5% being a mixture of spelt and rye. Hydration is 67%.
Here are a couple I knocked up this week. Nothing special -- they're pretty well this good every time I bake one now. I've just about got it down.
Perhaps I'll submit them to Yeastspotting this week. I think they're good enough.
And the crumb:
Another Place Miche
Recipe:
Stage 1
6 grams starter
8 grams water
14 grams flour (2 grams wholewheat, 1 gram spelt, 1 gram rye, 10 grams strong white bread flour)
First stage takes anywhere from 6 to 16 hours to double in size and become nicely aerated. I tend to go for about 12 hours.
Stage 2
28 grams starter (from stage 1 --alternately, from stage 3.)
16 grams water
30 grams flour (5 grams wholewheat, 3 grams spelt, 1 gram rye, 21 grams strong white bread flour)
Stage 3 (for a single loaf)
74 grams starter (from stage 2)
28 grams water (if doubling quantities, use 64 grams water)
50 grams flour (9 grams wholewheat, 5 grams spelt, 2 grams rye, 34 grams strong white flour.)
(If doubling quantities, I use 64 grams water, 20 grams wholewheat flour, 10 grams spelt, 4 grams rye, 80 grams of strong white bread flour.)
Whether you're making one loaf or two, you wamt to have 28 grams of starter left over so that you can use it as your stage 2 starter for your next loaf. Before you're ready to bake, take off 28 grams and put it in a container. Leave it on your conntertop, or pop into the fridge.
Mix the 115 grams starter from stage3 into 312 grams of warm water. Add 190 grams of wholemeal flour, 40 grams of spelt and 14 grams of rye. Mix thoroughly, cover, and allow to stand for an hour or two.
After two hours, add 8 grams ground sea salt and 222 grams strong white bread flour and knead your dough for around 10 mins.
Oil a bowl pop your dough in and cover for an hour. After an hour, stretch and fold, and then back into the bowl for another hour. After the second hour, stretch and fold the dough then back into the bowl and cover again.
Wait until the dough has doubled in volume. At the moment, with kitchen temp at about 18 degrees c, that's taking about four or five hours from mixing the dough.
When the dough has doubled in volume, get it out and shape into a boule, then pop it into a lined bowl or banneton amd wait until the dough has doubled in size again.
Pre-heat the oven for half an hour (or more, depending on the size of your oven stone. At the moment, I'm using a pizza stone which does fine.) My oven is a fan assisted oven, and I heat it at the max,. 245 c.
Slash the top of your dough -- I use the classic hash slash -- pop it onto your oven stone, liberally apply steam to your oven using whatever method you prefer (I use a combo oven dish filled with a cup of boiling water, and spritzes of water every two mins for the first 8 mins.
For a single loaf, I bake for 10 minutes at 245 c, then turn down to 235 c for an additional 10 mins. Then, I turn down to 200 for the last 10 mins, upending the loaf 5 minutes before it's due to come out to make sure the loaf is evenly browned on the bottom.
After 30 mins, I rap the bottom to make sure it sounds hollow. If it doesn't, give it an additional 5 minutes, but usually it's fine after 20 mins.
Put it on a cooling rack and let it cool.
Monday 3 October 2011
The quality improves
I said in my last post that I felt as though I'd made a breakthrough in my baking. Since then, I've baked another three or four loaves, using the same basic recipe, but with slight adjustments -- to the starter -- I didn't have enough of the firm starter that I normally use for this recipe, nor did I have the three days that it needs to make it -- so I reverted to my usual 100% hydration starter.
And of course, that throws out your hydration levels.
I suspect that many of my problems in the past have been a consequence of inaccuracy around my hydration levels. I'd been relying on one of the many on-line calculators. Maybe it worked and it was just me being careless? Maybe it was rubbish? And I don't think I ever used the same calculator twice.
Last week though, I discovered what I feel to be the best of all the online calculators for doing hydration levels. It's simple. It's graphic, so it's easy to read and to use. Here's a link. Have a little play around with it.
Anyway, having nailed my hydration level issue, there were a couple of other issues that needed nailing. Shaping, and adequate proofing times.
In the past, I'd simply go by what the recipe said. If it told me to bulk ferment for two and a half hours, that would be what the loaf would get. Yes, they always said that you have to go by how the dough feels -- but unless you know what proper dough feels like at the various stages, you're just kinda guessing.
And it shows in the loaf.
Looking back, I can see that my sourdough loaves have always been a bit underproved, a bit underdeveloped. Well, sometimes it was a bit -- and sometimes it was a lot.
The loaves were edible. They tasted great. But the crumb was *really* tough -- even when the loaf had risen enough.
I wasn't getting enough air in. The bulk ferment wasn't right. The proving wasn't right. The shaping wasn't right either. Hang on a sec:
Formula
Kneading
Bulk ferment
Proving
Shaping
That's just about *everything* that needed improving...
OK, lets take it from the top, and I'll use the loaf I baked last night as an example.
As I said, the recipe I was using was based on Shiao Ping's Gerard Rubaud Miche. I didn't need such a humungous loaf though, and I didn't have the three days to buld her biga-like starter, so I just wanted to whack it out using the starter I had in my fridge -- which was nice and ripe, but was 100% hydration.
So the recipe went:
150g ripe sourdough starter
292g water
90g wholewheat flour
40g spelt flour
14g rye flour
322g white flour
Mix the starter and the water together, and then add the various flours.When they're well mixed, cover the bowl for 25 mins to let the dough autolyse -- then add your 10g salt and start kneading the dough.
I know people say that you don't need to knead after autolysing. Personally, I've tried it both ways, and it comes out better with kneading. I give it about 10 mins using the Bertinet Method of kneading. Then, I make a ball, oil my glass mixing bowl, slap it it in and cover it with cling film.
After 30 minutes, I do a series of stretch and folds. I like to alternate my stretch and fold methods, so if I start using the envelope fold method, the next time I'll use Bertinet's stretch and fold technique.
I don't know if the style is crucial, but I think that it's crucial that you do them. It seems to really help in developing the gluten and getting a good, solid skin when you shape your dough later.
So, I do four lots of stretch and folds doing a set after 30 minutes. After my final set, I leave the dough alone until it doubles in size. I'm checking the sides of my glass bowl to make sure that I've got good, even aeration throughout the dough. If I've got both of these things -- which generally takes between an hour and a half to two hours, *after* my last set of stretch and folds -- then I'm ready to get my dough out of the bowl and stat shaping.
Shaping is something that I struggled with in the past as well, but that was because I wasn't giving my dough enough time to develop. Once I had, the whole thing became much easier to work with. So, I'd form a boule. Let it rest on the counter for five minutes. De-gas and flatten into a circle, then reshape into a boule for the second time. Another five minute rest. Then, do your second shaping.
There are a whole pile of YouTube videos that demonstrate shaping a boule. As long as your dough is sufficiently matured, theu're all good. Here, check it out. Reinhart again:
Once you've got your shaped boule, slap it into the Banneton to prove.
In the past, I was giving my loaves around an hour or an hour and a half to prove. That seemed right. It was what the recipe generally said. If you went by the size of the dough ball that I began with after mixing my dough, it was definitely double that size. And wouldn't the oven spring take care of any additional growth?
If you scroll back in my blog, you can see what my earlier loaves look like. As I said, they weren't bad. They tasted good. But some were better than others. I didn't have any consistency. Now, I believe I've cracked that. Check the loaf that I posted in my previous blog entry. And now check this one:

So now, I feel like I can move on to bake other breads having finally mastered the fundamentals of sourdough.
I suspect that many of my problems in the past have been a consequence of inaccuracy around my hydration levels. I'd been relying on one of the many on-line calculators. Maybe it worked and it was just me being careless? Maybe it was rubbish? And I don't think I ever used the same calculator twice.
Last week though, I discovered what I feel to be the best of all the online calculators for doing hydration levels. It's simple. It's graphic, so it's easy to read and to use. Here's a link. Have a little play around with it.
Anyway, having nailed my hydration level issue, there were a couple of other issues that needed nailing. Shaping, and adequate proofing times.
In the past, I'd simply go by what the recipe said. If it told me to bulk ferment for two and a half hours, that would be what the loaf would get. Yes, they always said that you have to go by how the dough feels -- but unless you know what proper dough feels like at the various stages, you're just kinda guessing.
And it shows in the loaf.
Looking back, I can see that my sourdough loaves have always been a bit underproved, a bit underdeveloped. Well, sometimes it was a bit -- and sometimes it was a lot.
The loaves were edible. They tasted great. But the crumb was *really* tough -- even when the loaf had risen enough.
I wasn't getting enough air in. The bulk ferment wasn't right. The proving wasn't right. The shaping wasn't right either. Hang on a sec:
Formula
Kneading
Bulk ferment
Proving
Shaping
That's just about *everything* that needed improving...
OK, lets take it from the top, and I'll use the loaf I baked last night as an example.
As I said, the recipe I was using was based on Shiao Ping's Gerard Rubaud Miche. I didn't need such a humungous loaf though, and I didn't have the three days to buld her biga-like starter, so I just wanted to whack it out using the starter I had in my fridge -- which was nice and ripe, but was 100% hydration.
So the recipe went:
150g ripe sourdough starter
292g water
90g wholewheat flour
40g spelt flour
14g rye flour
322g white flour
Mix the starter and the water together, and then add the various flours.When they're well mixed, cover the bowl for 25 mins to let the dough autolyse -- then add your 10g salt and start kneading the dough.
I know people say that you don't need to knead after autolysing. Personally, I've tried it both ways, and it comes out better with kneading. I give it about 10 mins using the Bertinet Method of kneading. Then, I make a ball, oil my glass mixing bowl, slap it it in and cover it with cling film.
I don't know if the style is crucial, but I think that it's crucial that you do them. It seems to really help in developing the gluten and getting a good, solid skin when you shape your dough later.
So, I do four lots of stretch and folds doing a set after 30 minutes. After my final set, I leave the dough alone until it doubles in size. I'm checking the sides of my glass bowl to make sure that I've got good, even aeration throughout the dough. If I've got both of these things -- which generally takes between an hour and a half to two hours, *after* my last set of stretch and folds -- then I'm ready to get my dough out of the bowl and stat shaping.
Shaping is something that I struggled with in the past as well, but that was because I wasn't giving my dough enough time to develop. Once I had, the whole thing became much easier to work with. So, I'd form a boule. Let it rest on the counter for five minutes. De-gas and flatten into a circle, then reshape into a boule for the second time. Another five minute rest. Then, do your second shaping.
There are a whole pile of YouTube videos that demonstrate shaping a boule. As long as your dough is sufficiently matured, theu're all good. Here, check it out. Reinhart again:
Once you've got your shaped boule, slap it into the Banneton to prove.
In the past, I was giving my loaves around an hour or an hour and a half to prove. That seemed right. It was what the recipe generally said. If you went by the size of the dough ball that I began with after mixing my dough, it was definitely double that size. And wouldn't the oven spring take care of any additional growth?
If you scroll back in my blog, you can see what my earlier loaves look like. As I said, they weren't bad. They tasted good. But some were better than others. I didn't have any consistency. Now, I believe I've cracked that. Check the loaf that I posted in my previous blog entry. And now check this one:
So now, I feel like I can move on to bake other breads having finally mastered the fundamentals of sourdough.
Thursday 29 September 2011
Catching up
I've been neglecting my blog of late. Which isn't to say that I've been neglecting my baking, but I have had a couple of struggles -- more about those anon.
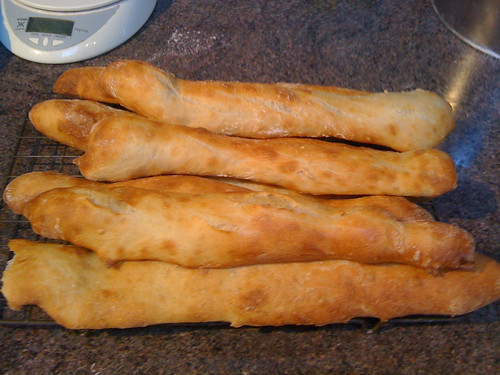
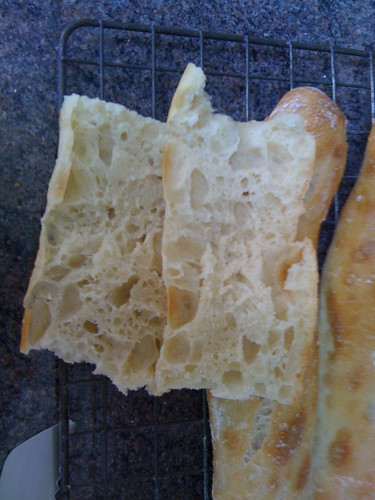
Interesting things I've baked lately: I took a shot at baking baguettes using Peter Reinhart's Pain a la Ancienne method. This technique uses a very, very cold, very, very wet dough, and a tiny amount of yeast, and the dough is left for a very long time to allow the flavour to develop some proper complexity.
It was an interesting exercise in baking, and the baguettes themselves were perfectly fine -- after a fashion. However, I really struggled to shape the loaves, and so while they tasted fine, they didn't actually look great. And I do want my bread to look good as well as tasting good. After all, anticipation is an important part of eating.
I will try this recipe again, but I'll try it as foccacia or as a rough country loaf rather than as baguettes. Here's a couple of pictures from the bake:
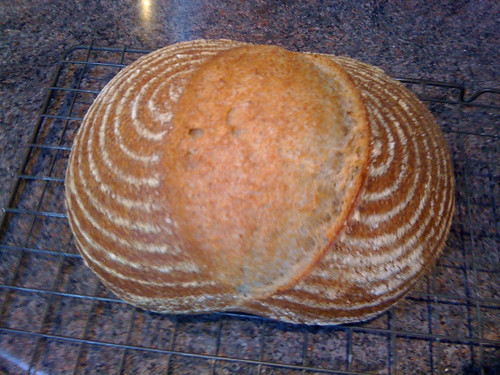
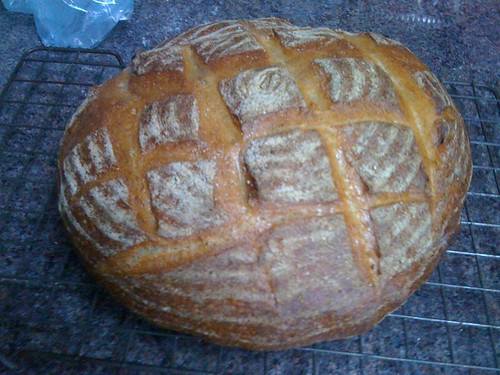
A much more successful project, from my point of view, has been my attempt to create a poilane-style miche. The idea is to reproduce the loaves produced by the late Lionel Polaine, whose signature country-style hearth baked loaf (the miche) is widely regarded as possibly the best loaf in the world.
I've tried a couple of recipes, but I think the one that I liked the best -- and the one that I had most success with, has been the blogger, Shiao Ping's miche in honour of baker, Gerard Rubaud, the aptly named Gerard-Rubaud miche.
There were two things that were interesting to me about this loaf. All of my other breads had used a starter with a fairly high hydration -- generally 100% hydration. Also, I normally just take my starter out of the fridge, give it a quick refresh and I'm baking a few hours later.
The Gerard Rubaud miche, in contrast, uses a firm starter -- akin to the Italian style biga, rather than the more usual sponge type levain. And the starter is a multiple-grain biga, that's built slowly, a little over time, over about three days.
This is not a loaf for the person in a hurry.
You can find the recipe for the loaf linked above on Shiao Ping's blog, but the loaf contains wholewheat flour, rye, spelt and plain flour.
Here's a picture of my first attempt at the Gerard Rubaud miche. It tasted as good as it looked.

My baking hasn't all been plain sailing of late though. I bought a bag of bread flour from Tescos a few weeks ago, and it completely screwed with my baking. I couldn't get a decent loaf out of the whole bag. Every dough I made was overly sticky and never became workable. Every single loaf I made using that bag was inedible and ended up as compost. And what's more, I used it to refresh my starter, so the whole thing infected my motherdough.
I managed to refresh the whole thing out eventually, but the incident completely undermined my confidence in my ability to bake sourdough. I started adding a pinch of quick yeast to my loaves, just to be sure that the dough would be workable and would rise sufficiently.
This weekend, I was discussing my problems with the very helpful guys on Northwest Sourdough on their troubleshooting forum. [Note: the thread has now been moved. You can find it here. Ice and Theresa over there were particularly helpful to me in talking me though the process, and so as I was chatting with them, I decided I'd make a sourdough and post about it in real time. The people over there could give me feedback and we could talk about any issues as they came up.
I didn't need a whole lot of advice, but what I did get was the equivalent of a masterclass in sourdough baking. Firstly, I learned that my hydration calculations were wrong. That explains why my dough was always wetter than I expected it to be.
I also made a breakthrough in terms of my handling the dough -- stretching, folding, degassing, shaping. In the past, I've followed the YouTube videos on the subject, but I never really knew what the dough was supposed to feel like at the various stages. For me, that's been the biggest breakthrough. Everything that I read says that you have to be able to understand who the dough is supposed to feel at any given time. Unless someone actually shows you how to do it with a piece of dough that is good dough though, you've got no point of reference.
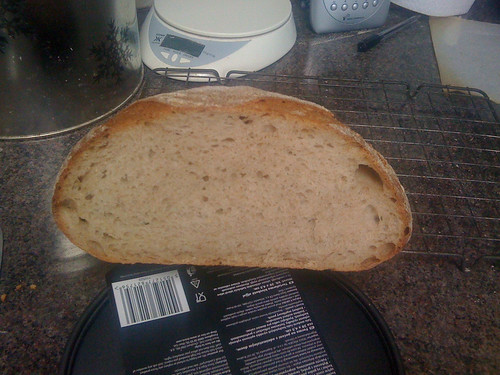
However, because I knew that my dough was good, I was finally able to get a handle on how it should feel at every stage. When I finished my loaf, it came out and was unquestionably the best loaf I'd ever baked. Everything about it was absolutely perfect from my point of view. Perfect crust, perfect crumb, great oven spring, fantastic taste. Moist with great keeping capabilities. Here are a couple of pictures:
I was shooting for a 64% hydration, but as my calculations were off, I ended up with a 70% hydration dough. In the past, I've not been taken with loaves of such high hydration. They've turned out tough, and ended up making terrible toast. This loaf was the exact opposite though. Tender, moist, perfect with butter and perfect toasted.
Here's a crumb shot:

And it tasted every bit as good as it looked. In fact, I've got one proving as I speak...
Interesting things I've baked lately: I took a shot at baking baguettes using Peter Reinhart's Pain a la Ancienne method. This technique uses a very, very cold, very, very wet dough, and a tiny amount of yeast, and the dough is left for a very long time to allow the flavour to develop some proper complexity.
It was an interesting exercise in baking, and the baguettes themselves were perfectly fine -- after a fashion. However, I really struggled to shape the loaves, and so while they tasted fine, they didn't actually look great. And I do want my bread to look good as well as tasting good. After all, anticipation is an important part of eating.
I will try this recipe again, but I'll try it as foccacia or as a rough country loaf rather than as baguettes. Here's a couple of pictures from the bake:
A much more successful project, from my point of view, has been my attempt to create a poilane-style miche. The idea is to reproduce the loaves produced by the late Lionel Polaine, whose signature country-style hearth baked loaf (the miche) is widely regarded as possibly the best loaf in the world.
I've tried a couple of recipes, but I think the one that I liked the best -- and the one that I had most success with, has been the blogger, Shiao Ping's miche in honour of baker, Gerard Rubaud, the aptly named Gerard-Rubaud miche.
There were two things that were interesting to me about this loaf. All of my other breads had used a starter with a fairly high hydration -- generally 100% hydration. Also, I normally just take my starter out of the fridge, give it a quick refresh and I'm baking a few hours later.
The Gerard Rubaud miche, in contrast, uses a firm starter -- akin to the Italian style biga, rather than the more usual sponge type levain. And the starter is a multiple-grain biga, that's built slowly, a little over time, over about three days.
This is not a loaf for the person in a hurry.
You can find the recipe for the loaf linked above on Shiao Ping's blog, but the loaf contains wholewheat flour, rye, spelt and plain flour.
Here's a picture of my first attempt at the Gerard Rubaud miche. It tasted as good as it looked.
My baking hasn't all been plain sailing of late though. I bought a bag of bread flour from Tescos a few weeks ago, and it completely screwed with my baking. I couldn't get a decent loaf out of the whole bag. Every dough I made was overly sticky and never became workable. Every single loaf I made using that bag was inedible and ended up as compost. And what's more, I used it to refresh my starter, so the whole thing infected my motherdough.
I managed to refresh the whole thing out eventually, but the incident completely undermined my confidence in my ability to bake sourdough. I started adding a pinch of quick yeast to my loaves, just to be sure that the dough would be workable and would rise sufficiently.
This weekend, I was discussing my problems with the very helpful guys on Northwest Sourdough on their troubleshooting forum. [Note: the thread has now been moved. You can find it here. Ice and Theresa over there were particularly helpful to me in talking me though the process, and so as I was chatting with them, I decided I'd make a sourdough and post about it in real time. The people over there could give me feedback and we could talk about any issues as they came up.
I didn't need a whole lot of advice, but what I did get was the equivalent of a masterclass in sourdough baking. Firstly, I learned that my hydration calculations were wrong. That explains why my dough was always wetter than I expected it to be.
I also made a breakthrough in terms of my handling the dough -- stretching, folding, degassing, shaping. In the past, I've followed the YouTube videos on the subject, but I never really knew what the dough was supposed to feel like at the various stages. For me, that's been the biggest breakthrough. Everything that I read says that you have to be able to understand who the dough is supposed to feel at any given time. Unless someone actually shows you how to do it with a piece of dough that is good dough though, you've got no point of reference.
However, because I knew that my dough was good, I was finally able to get a handle on how it should feel at every stage. When I finished my loaf, it came out and was unquestionably the best loaf I'd ever baked. Everything about it was absolutely perfect from my point of view. Perfect crust, perfect crumb, great oven spring, fantastic taste. Moist with great keeping capabilities. Here are a couple of pictures:
I was shooting for a 64% hydration, but as my calculations were off, I ended up with a 70% hydration dough. In the past, I've not been taken with loaves of such high hydration. They've turned out tough, and ended up making terrible toast. This loaf was the exact opposite though. Tender, moist, perfect with butter and perfect toasted.
Here's a crumb shot:
And it tasted every bit as good as it looked. In fact, I've got one proving as I speak...
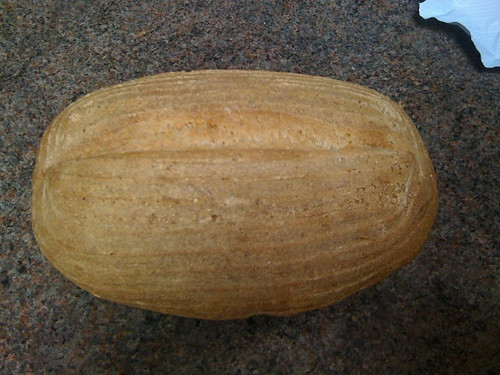
Monday 15 August 2011
Small white sourdough
Experimenting with small loaf sizes and long fermentation. These two had the levain fermenting for 15 hours, and a bulk fermentation in the fridge for about 9 hours, before proving in the bannetons for an additional 2.5 hours.
Pretty loaves, but I haven't tasted them yet. Sainsbury's own brand strong white bread flour.
Saturday 13 August 2011
Monday 8 August 2011
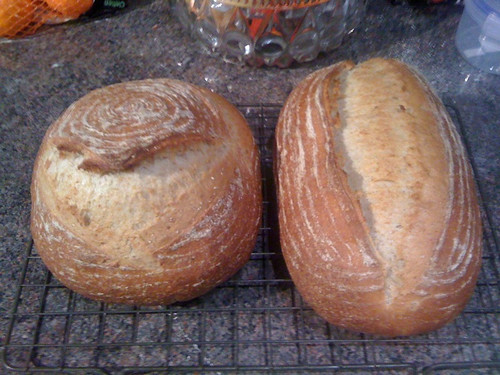
Better Place sourdough
Better Place sourdough, a photo by flimbag on Flickr.
I baked two loaves today.
I made a batch of dough last night, left it in the fridge for an overnight bulk ferment, and then was in too much of a hurry to get it into the oven this morning. Damn thing was underproved, and so it blew out of the bottom, and was undercooked in the middle. Really, just fit for the compost heap.
Of course, I hate not having a proper loaf in the house now, so I whipped up a new one this afternoon. Again, to my own recipe, using my own sourdough starter -- this is definitely the best of all of the loaves that I make. Mostly white, with around 15% rye flour and 5% wholemeal. this loaf has just the right amount of flour and flavour.
Looking in Sainsbury's this afternoon, a 400 gram sourdough (that's OK but not very good) will cost you £1.65. So an 800 gram loaf like this one, would cost about £3.30. It's just flour, water, yeast and salt -- and the yeast comes free!
There's gotta be a decent living if you could make bread as good as this on a large scale. I really like my idea of artisan bakery as a social enterprise. If I get made unemployed any time soon, that's what I'm gonna do.
Sunday 7 August 2011
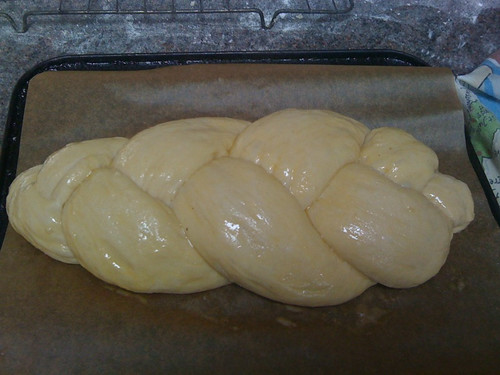
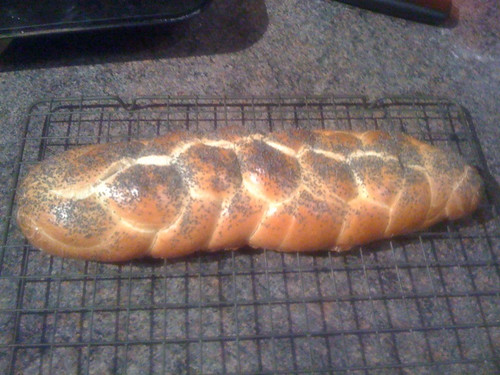
Another day, another challah!
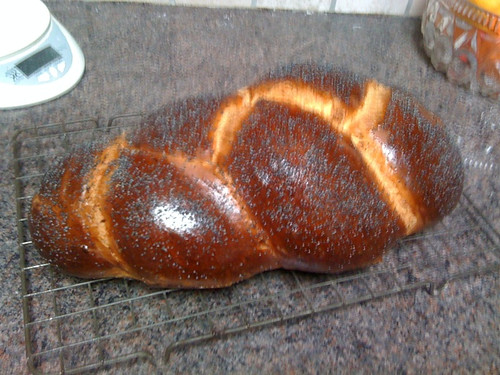
Refusing to be defeated, I've decided to have another stab at a challah. This time, I'm going the yeasted (*spit*) route, in the hope that once I've mastered it, I'll go back to sourdough.
Using Peter Reinhart's recipe in Crust and Crumb. He's got a later recipe in one of his later books, but this one is for a single loaf, so I thought that would make it easier (given that I didn't want to use a crate of eggs, a sledge of butter and then have to throw it all out again.
Here's his recipe, along with my commentary:
3½ cups (16 ounces) unbleached bread flour
¼ cup (2 ounces) sugar
1 teaspoon (0.25 ounce) salt
2 teaspoons (0.22 ounce) instant yeast
2 tablespoons (1 ounce) unsalted butter, softened
2 large eggs (3.33 ounces), beaten
2 large egg yolks (1.33 ounces), beaten, plus 1 yolk for egg wash
¼ cup (2 ounces) milk, at room temperature
½ cup water, at room temperature
Poppy or sesame seeds for topping (optional)
Vegetable oil cooking spray.
1. Combine all the dough ingredients in a bowl and mix to a ball.
2. Pour out onto a floured surface and knead for 12 - 15 minutes until the dough is soft, pliable and neutral to the touch. It should be slightly tacky. If necessary, add flour.
Damn thing ate up a pile of flour. I'm pretty sure this is where I went wrong with my last effort. I just followed the recipe exactly, and yeah, it seemed terribly wet so I just used Richard Bertinet's method for working with wet doughs.
When I started with this I had to use Bertinet's method as well. No other way to get it into a kneadable state otherwise. But I kept on adding flour, until I got a sense of it being slightly tacky but workable. It was a long knead -- almost 20 mins, but I think it's probably impossible to over-knead with Bertinet's method.
Eventually, I got something that felt like a bread dough -- as opposed to a cakey type thing. So I went on:
3. Place in a clean, oiled bowl and cover with cling film. Let it rise for an hour -- until it's about doubled in size.
4. Remove the dough from the bowl and knead by hand for another 5 minutes. Re-oil your bowl, pop the dough back in. Re-cover with cling film. Another rising, another hour, another doubling.
So far, so good. Still needs plenty of flour, but it's workable and does behave like dough. Because of all the oils and fat and sugar, you don't want to be working this with your hands for very long because it does get sticky again quickly. Started off with classical kneading, but soon reverted to the Bertinet method again.
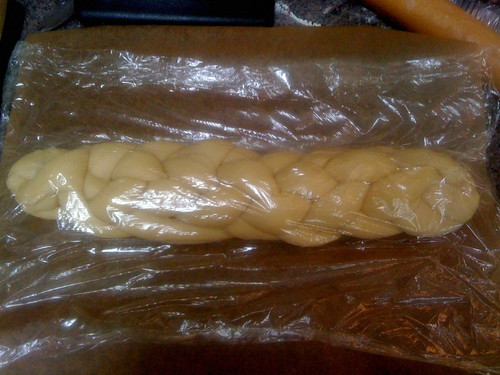
5. Divide the dough into three equal pieces (or more if you're making a more complex plait. I'm gonna try the easy one this week to minimize handling). Mist with cooking oil, cover and allow to rest for 20 mins.
6. Working quickly, roll the pieces into eight inch long cigar shapes -- fatter in the middle, thinner on the ends. Cover each piece as you finish working it.
7. Once you've got your plaits, lay them side by side on a floured surface. Plait the loaf. I'll link to a YouTube video to show how this is done.
8. Put the loaf on a baking sheet that's been lined with baking parchment. Beat a single egg yolk. Use half the beaten egg to glaze the plait. Cover with cling film or a towel and let it rise for another hour or until doubled in size.
Still looking good. I prefer the other method of creating the plaits, in which you roll them out with a rolling pin and then roll them up. It seemed easier to work with them that way. I managed to get the thing plaited up, but it kept expanding as I kept plaiting.
9. Pop a shelf in the middle and preheat your oven to 190c -- 180c if you're using a fan assisted jobby as I am.
10. Use the rest of the egg yolk to glaze the loaf again. If you're using poppy seeds, now is the time to put them on.
11. Slap the thing in the oven for about 45 mins, turning half way through for even browning. Loaf wants to be about 85c in the centre when cooked. Or, you know, whack it on the bottom and hope it sounds challahw.
Gone into the oven now. This one had definitely doubled in size before it went into the oven -- unlike my previous sourdough attempt, which had just stopped by that point. Gonna be interesting to see how much oven spring I get, but so far, everything followed the recipe, as you'd expect.
12. Get it out, slap it on a rack. Let it cool for an hour. Voila! Or not?
Whoa! Just checked it out after 15 mins and the damn thing is a monster! A challah the the size of a three year old kid! It's a little dark already, so I've turned the heat down, but it's impressive so far.
I'm done. Final pic at the top of the page. Looks like a winner!
Thursday 4 August 2011
Spelt sourdough
Spelt sourdough, a photo by flimbag on Flickr.
This was a peculiar stuff to work with. That challah recipe claimed it would feel like modelling clay to work with. It didn't.
This 20% spelt dough, on the other hand, felt just like modelling clay. I'd left the shaped loaf in the fridge for a long overnight prove, and when I got to it in the morning, I could see big air bubbles appearing before my eyes, just below the skin of the loaf.
Then, when I tried to slash the loaf, I began to see just how wet the dough was below the skin. I started to lose control of my loaf during the slashing, so I gave up before I'd finished and slammed it in the oven.
It seemed to behave fine once it was in the oven. Completely predictable. I've just taken it out, so I've no idea what the flavour or the crumb are like. I made this one 20% spelt, 80% white so I could get some sense of what the spelt flavour was like, without producing a heavy, inedible loaf. I've seen pictures of 100% spelt loaves and they don't look that appetizing.
This one does look appetizing -- albeit somewhat lopsided. I'll post more when I've cut it and know about the crumb and the flavour.
On tasting, I found this a bit disappointing. Perhaps it's because spelt is an acquired taste, but I didn't find it an improvement on either my white loaves or my wholemeal loaves. Also, the loaf seemed to dry out and stale very rapidly, which was a surprise because I didn't bake it especially long or hot.
I'll try spelt again -- perhaps with wholemeal or rye -- but I'm not holding out a lot of hope for it. Obviously, there's a reason we use the flour we use most -- it's tastiest. Unless you've got some kind of gluten allergy, I don't see any reason to be messing with this stuff.
WTF?
Did an overnight prove in the fridge yesterday and this is what I ended up with...
Not sure what went wrong here. The loaf was inside a plastic bag that was sealed, but it looks as though all of the moisture has leaked out of the outer half-inch of loaf or so.
Haven't cut into it yet, but there was virtually no oven spring or increase in size once the thing went into the oven. Could I have over-proved it?
Tuesday 2 August 2011
Norwich sourdough
Promised I'd take Beryl a loaf to London tomorrow. These are mostly white, with 5% rye and 5% wholewheat.
Edit: of course, I forgot to take it with me. I baked it, I bagged it up, and then I started to panic -- have I got the train tickets? My wallet? My phone?
I always forget something. This time, it was Beryl's loaf. She'd chosen the round one.
It was very tasty.
Monday 1 August 2011
White sourdough

A very pretty loaf tonight. Just a standard white sourdough, but I'm getting the hang of not completely degassing when I shape the loaf before proving, and that gave me a much bigger rise when proving, and an all around bigger loaf.
When it came out of the oven, I could hear the crust singing. First time I've ever had a singing crust. My heart was singing too.
Bread. How I love to bake it.
This one is Sourdough #38
Sunday 31 July 2011

White sourdough
The uselessness of my challah left me without bread. Whipped this up and let it prove overnight.
Saturday 30 July 2011
Sourdough Challah -- baked!
Hardest loaf so far. Everything about this loaf was hard, and nothing behaved as the recipe said it would. It said it wouldn't rise during the bulk ferment and it rose like mad. It said the texture would be like modelling clay -- it was more like ointment. Braiding was murder. Then, it said it'd rise three times its size during a five hour prove, and it didn't rise at all!
Next time I try Challah, I'll do a yeasted one rather than a sourdough one.
But at least it's recognizable as challah!
Edit: On cutting, it's gotta be pronounced a failure. Too heavy and doughy. Will try again with yeast next time.
Sourdough Challah - first ferment
Bertinet's method a revelation. I've watched the videos, never really believed it would happen.
Friday 29 July 2011
Sourdough Challah
Built a biga-life firm sourdough starter tonight, with the aim of baking a couple of sourdough challah's tomorrow.
No question that this will be the most complex bread I've baked yet. Interesting to see how it goes. Gotta wait for my biga to triple in size, which it should have done by midday tomorrow.
Need to buy honey and eggs in the morning, before I bake.
The recipe I'm working from is here:
Sourdough Challah
Thursday 28 July 2011
Another Place Sourdough
Happy to be back in baking action.
Yesterday's wholewheat and spelt effort was truly delicious. It probably could have used a little more salt -- I was overcompensating for the excess of salt in my previous loaf. At the moment, I'm using Cornish Sea Salt, and measuring by volume. I'm going to have to buy a little drug dealer gram scale so I have something that's accurate to less than a gram. Though my current scale claims it's accurate to the gram, my sense is that it's really only measuring in two gram increments.
This morning, I'm back on my own home-grown recipe -- this time, with the addition of a little rye and wholewheat flour to give the white flour a bit of substance.
Main flour is Sainsbury's own brand Strong Bread Flour. I wanted to see how it performed in comparison to the extra high gluten flour.
Loaf is still cooling. More after I taste it.
Wednesday 27 July 2011
Wholemeal and spelt sourdough
Sunday morning: I'd had a couple of loaves proving in the fridge overnight, so I got up early to bake. I should have realized something was amiss when a fuse blew, but everything came back on and the oven felt warm, so when the usual hour was up, I put in my pan of boiling water, spritzed in some mist and slapped in my loaf.
When I came to turn it, ten minutes in, I figured out something was wrong. No malliard reaction. The crust was as pale as when I'd put it in. And when I felt the loaf to turn it, the loaf was barely warm.
Turned out that the element on my oven had blown. They should last at least eight years, but this oven was only about four years old. According to the oven repair guy, Smeg had put in a more powerful element than the oven needed. You could see the bulge on the element where one part had distorted and touched another piece of the element.
So, £88 snots to repair that. Next time, I'll just follow these instructions and do it myself.
But I'm glad to be back in baking action.
Been listening to people on Facebook going on about how good spelt flour is. I know it's pretty low gluten stuff, so I didn't want to use it alone. I've seen a few spelt housebricks and they didn't look very appealing.
So I went with a 50% white flour, 25% wholemeal, 25% spelt mix. You can see the picture above. It's still cooling, so I'll let you know how it tastes tomorrow.
Thursday 21 July 2011
Wholemeal sourdough
Nice wholewheat sourdough tonight. 50% Canadian Extra Strong, 50% Sainsbury's Wholewheat flour.
I'll post a pic of the crumb when I cut it.
Tuesday 19 July 2011
White sourdough and granary sourdough
Tonight's bake
Baked two loaves tonight -- a white sourdough, and a granary sourdough. Here's a closer shot of the granary:
The granary didn't rise as much as I would have liked, and was a little dense, but the flavour was fantastic. Maybe a small amount of regular yeast along with the sourdough next time? Or possibly just longer proving? It had definitely doubled in size when I put it in the oven, but I didn't get much in the way of oven spring.
That said, I baked this one after I'd baked the white one, so perhaps the oven temp hadn't fully recuperated when I put it in?
Will bake again though.
Monday 18 July 2011
Wholewheat and Rye Sourdough
Wholewheat and Rye Crumb
Wholewheat and Rye Crust
So here's the loaf that I made last night. A bit of a cross between Norwich Sourdough from the Wild Yeast website, and the Mill Loaf from Dan Leppard's book, The Handmade Loaf.
It's funny, I really like Dan's book -- but I don't really like the look of many of the recipes in it. That said, it was an absolute bargain on Amazon, so I couldn't resist.
Bought another book today. I was wandering around Tesco, buying flour and *spit* yeast, when I saw a copy of the River Cottage Cookbook on Bread. I've been thinking about buying this one from Amazon as well, but when I saw it on offer for nine quid, I couldn't not snap it up.
I'll do some book reviews later -- damn Kindle gave up the ghost today so what else am I gonna do? -- but for now, back to last night's loaf.
Shaping has always been something of a struggle for me. Treat your dough gently, don't manhandle it, and it will repay you with fantastic bread.
Overwork your dough though, and you'll get a tough, nasty loaf that has the texture of old leather and a crust like cardboard.
I've made this loaf before and it didn't work out so well, largely because my oven runs a bit too hot, so the crust was overcooked -- too dark, too tough. But the flavour was good then, so I wanted to see how it would perform now I've got a bit more experience.
Last night, I was making a batard and my pre-shaping went well, but when I came to actually shape the loaf, it ended up too long for the banneton. While it's easy to make a short loaf longer, it's hard to make a long loaf shorter. I took another stab at it, but I ended up with two bulbous ends, and a weak, saggy part in the middle. Any possibility of getting good surface tension on the skin was disappearing rapidly.
So, I decided I'd just let it rest again, and reshape the whole thing as a boule. Which went without a hitch, except for the fact that the boule I put in the banneton was exactly the same size as the dough I'd started bulk fermenting three hours before.
Still, the whole thing doubled nicely within about two hours. Slashed it with a quick Tic-tac-toe pattern, and slammed it on my oven stone.
Fantastic taste and fantastic oven spring, but there are great big air pockets in the final loaf. Not millions, but more than I'd feared. My slashes didn't come out so well either. Not deep enough, perhaps? Or was it the fact that it wasn't exactly in the centre of the oven, so the hotter side got the most rise?
Whatever it was, the final loaf was delicious. Even when you win, you lose.
Saturday 16 July 2011
Saturday bake
Been baking again today.
Started mixing my leaven at about 5.30:

And created my dough at around 11.30, ready for a long overnight prove in the fridge.

Formed my loaves about 9.00am this morning:
And got them into the oven about 1.30 and 2.00 respectively.
They came out looking pretty well. Here's the first -- a boule:
Note the nice blistered crust -- a product of the long, overnight ferment:

Second was a batard, with a most impressive grigne:
All in all, a good day's work. I suspect the boule might be slightly underdone -- I'm trying to go for a lighter, crispier crust, so I'm turning down the heat to about 210 in my convection oven after 10 - 15 mins or so.
That said, both of them look great, both hit a dough temp of about 99C before I took them out of the oven.
But the proof will be in the eating. I'll upload some pictures of the crust after they've cooled.
Not expecting a very holey crumb with either of these, as the dough was a fairly low hydration effort. Expecting great sour though, because I could smell it as the dough was proofing.
Expect both to be yum!
Thursday 14 July 2011
Another Place Sourdough
I suppose if I'm going to blog about baking bread, the least I can do is to publish my recipe.
This is my own recipe, really influenced by two other great internet sourdough bakers. Teresa from Northwest Sourdough has a recipe for San Francisco Sour and Susan from Wild Yeast's Norwich Sourdough. Although it's a simple, plain white loaf, what I've really taken from those two loaves is the techniques that they suggest rather than the absolute ingredients, which I worked out for myself using a hydration calculator that I found on Northwest Sourdough.
Given that I live in Crosby, home of Anthony Gormley's Another Place sculpture, I'm calling this recipe Another Place's Sourdough.
Another Place's Sourdough
Ingredients
255 grams white levain (100% hydration)
200 grams water
470 grams flour
9 grams salt
Time
12 hours ripening levain
2.5 - 12 hours bulk fermentation
2 hours - 16 hours proving the loaf
30 - 40 minutes in the oven -- 240C for the first 10 mins, 200C for the last 20-30.
16 -18 hours before you're planning on baking, take 55 grams from your existing levain/sourdough starter. I keep mine in the refrigerator, and feed it every three or four days to ensure I've always got a ripe levain.
To your 55 grams of levain, add 100 grams of room temp. water, and 100 grams of flour. Mix together, and stand overnight. You're looking for a levain that will double in size in about 4 to 6 hours, depending on temperature. The cooler the temp, the longer the doubling will take. The longer you leave the levain before using it, the more flavour you'll get in your loaf.
After about 12 hours, take your levain and add it to a mixing bowl. Add 200 grams of room temperature water to your levain, and mix roughly together.
Weigh out 470 grams of bread flour, sift it, and add it to the levain and water mixture. I begin by adding around 420 grams of the flour as different flours have different absorbancy rates, and then add more and more until the dough seems right. What you're looking for is a dough that is tacky on the outside, but is neither saturated nor overly dry. Ultimately, recognition of what the dough should feel like is something you get with experience, so if you don't know what to look for, just use the exact measurements.
Once the flour, water and levain are mixed together and all the ingredients are incorporated, cover the mixing bowl and allow it to stand for 20 minutes while the dough autolyses. This process makes the dough much easier to knead, and again, makes a better dough.
Next, add your salt. Once the salt is added, it's time to knead. As salt retards the action of your yeast, the dough might be a little tough to work for the first minute or two. If it's too tough, just let it stand for a few more minutes, and then go back to kneading. Your dough should be soft, pliable and easy to knead.
Knead away for about five minutes, until the dough is smooth and pliable and can pass the windowpane test. At this point, oil a mixing bowl or a large tupperware container, using just a few drops on the tips of your fingers. If you're using a mixing bowl, cover the bowl with clingfilm. If a tupperware container, close the container. Allow your dough to stand for 50 minutes.
After 50 mins, gently pat the dough to de-gas it, then stretch your dough into a long rectangle. Fold your rectangle into thirds, then give the dough a quarter turn, and stretch and fold again.
After the stretching and folding is finished, the dough will be tight and hard to work again, so put it back in your container, recover and allow it to stand for another 50 minutes. Then repeat the folding procedure.
What you do next depends on whether you've got time to go ahead and bake in the next three hours, or whether you want to enhance your baking. If you have got time, let it ferment for a final 50 minutes in the container. If you don't have time to bake, you can put it into the fridge for up to sixteen hours. This extended bulk fermentation period will enhance the flavour, but if you have refrigerated the dough, you'll need to give it an hour or two when it comes out of the fridge to get back to room temperature.
Now you're ready to shape the dough. Again, Theresa from Northwest Sourdough has the best videos on YouTube that'll teach you how to shape a boule or a batard. Go and watch one of those.
When your loaf has been shaped, you now want to proof the loaf until it has almost doubled in size. This should take around two hours, but again, it depends on the ambient temperature. As with the bulk fermentation, you can proof two thirds at room temp, and then retard the fermentation either to match your other obligations, or to try and improve the flavour. Cover the loaf with a clean, well-floured cotton tea-towel, pop it into a plastic bag and then put it into the oven.
If you have a baking stone, make sure it's in the oven and pre-heat the oven on its maximum temperature for around 45 mins to an hour.
Five mins before you're ready to bake, put a shallow baking tin on the bottom of the oven containing half a cup of boiling water. The plan here is to try and fill your oven with steam for the first ten mins of the bake. If you have a plant mister, fill it with clean water, and use that to spray down the sides of the oven.
When the temperature is right, pop your loaf, seam side down, onto a peel or oven sheet that has been dusted with corn meal or semolina, or pop it onto a teflon oven mat. (I use the latter.) Slash the top of the loaf with a razor blade, a serrated knife or a lame if you have one, and then pop your loaf on the baking stone.
Keep the oven door closed for the first 5 mins, and then open the oven door and re-mist the oven walls with your mister -- trying to avoid heat escaping. At this point, I also turn the loaf by 180 degrees.
Another 5 minutes at maximum temperature and then I remove the oven tin with the boiling water. Time for steaming is over, it's time to bake.
Turn down the oven to 200C (fan oven) or 210C (ordinary convection oven), give the loaf ten more minutes, and then open the oven door and give the loaf a quarter turn. By now, the loaf has had twenty minutes. In my oven, it usually takes another ten minutes, but I like a lighter, crisper crust. If you prefer a crunchier crust, it may take another twenty minutes.
Test whether the loaf is done either by tapping on the bottom, and listen for a hollow sound. When it sounds hollow, it's done.
Alternatively, you can insert a food thermometer. The inside of your loaf should measure around 99 degrees centegrade (210 fahrenheit). Take the loaf out of the oven, pop it onto a wire rack and leave it to cool for about two hours.
Then cut, butter and eat.
Sourdough #27

So my bannetons arrived this morning...
If I'd known that I was going to get as obsessed with baking bread when I first started, I'd have been more scrupulous about recording and documenting what I was doing. As it was, I just kind of fell into it.I've been somewhat interested in sourdough for a couple of years now. By which I mean I'd read the FAQ, and toyed with the idea of baking it, but I never really did anything about it.
Then two things happened. Nigel Brunton posted on Facebook about how he had a sourdough loaf about to go into the oven -- and so I had a conversation with Nigel about how I've been thinking about doing it. And secondly, my wife Gerry got a starter going and baked her first loaf.
That loaf came out well. By which I mean that it rose well, and the crust and crumb were both acceptable. But it didn't really taste like sourdough.
And the more I read about it, the more it seemed it didn't look or taste like sourdough either.
Like many men, I'm obnoxious in my treatment of women. If a woman does X, I'm inclined towards saying, 'Well yeah, that's kind of OK but you should have done X, Y and Z. Then it would have been *really* good.'
Like most men, mostly I'll just gripe and moan and issue instructions as to how to improve something. But every now and again, I'm inclined to *show* them how it's supposed to be done if you're going to do the thing properly.
Somehow, sourdough baking fell into this last category.
When it came to baking the second loaf, I'd read a pile of introductory recipes on the net. And the second loaf was definitely an improvement on the first. But the more I read, the more I knew, the more dissatisfied I was with my loaf. I could see that it wasn't enough to just bake the damn thing. You needed paraphernalia to do this thing properly. And if there's one thing that a man likes, it's paraphernalia. Or as we normally refer to them -- toys.
Over the past few weeks, I've spent a pile of money on all manner of baking stuff. A cast iron casserole dish for making No Knead bread (a disappointing failure.) A granite counter-top protector to use as an oven stone and the old wood and coal fire oven (a great success -- that produced the 'oven spring' my bread had been lacking up until that point.)
As I said, I've had the crust and crumb sorted out for some time now. What my loaves were really lacking was aesthetic appeal. I was forming batards by hand, and doing my second prove in an old floured tea-towel. The taste was usually fine, but they tended to look awful. A peculiar shapeless mass.
And the other thing that I didn't seem able to master was the 'grigne' -- that wonderful effect that happens when you slash a loaf and the loaf rises in a controlled manner to form that striated effect, along with the bit that the French refer to as 'the ear' -- that flap of dough at the slash that tends to become the darkest part of the loaf.
Slashing is a crucial part of artisan bread, not only because the controlled bloom looks so great, but it's a critical part of how you shape a loaf.
Unfortunately, because of the high hydration levels of the dough I've been mixing, my attempts to slash the loaf tended to drag and make an unsightly edge, and allows all of the air to go out of the dough, leaving me with a floppy mess. I had been thinking that in order to get the kind of slashes that I wanted, I'd need to buy an expensive lame -- Mure and Peyrot do a lovely plastic razor blade holder for a tenner -- how could I possibly go wrong with such a thing?
But I've been experimenting with longer proving times -- refrigerating the dough overnight during bulk fermentation, and refrigerating the formed loaf for a few hours in order to improve flavour. I noticed that if I used a serrated knife on a loaf after it had come out of the fridge, I was able to slash it in exactly the ways I'd been trying and failing at when the dough was at higher temperatures.
And if I underproved the dough slightly before putting it in the fridge for the second retarded prove, I also got a much improved oven spring. These two factors, when combined together, got me far closer to my goal of making the perfect artisan loaf.
But the thing that seems to have made the most difference was the purchase of my bannetons. Every time I read a recipe, or watch a little breadmaking clip on YouTube, the baker always has a banneton or a brotform that they use to shape their loaves. I couldn't help but think that they were contributing more than just that pretty spiral pattern on the loaf. And bakers are notoriously stingy. It's hard to imagine that they'd be spending twelve quid on a proving basket if it didn't have a significant impact in some way.
Well, you can judge for yourself. But I'm really impressed. My loaves appear to have made a step up to the next level.
Twelve quid well spent.
Subscribe to:
Posts (Atom)