Thursday, 29 September 2011

Catching up

I've been neglecting my blog of late. Which isn't to say that I've been neglecting my baking, but I have had a couple of struggles -- more about those anon.

Interesting things I've baked lately: I took a shot at baking baguettes using Peter Reinhart's Pain a la Ancienne method. This technique uses a very, very cold, very, very wet dough, and a tiny amount of yeast, and the dough is left for a very long time to allow the flavour to develop some proper complexity.

It was an interesting exercise in baking, and the baguettes themselves were perfectly fine -- after a fashion. However, I really struggled to shape the loaves, and so while they tasted fine, they didn't actually look great. And I do want my bread to look good as well as tasting good. After all, anticipation is an important part of eating.

I will try this recipe again, but I'll try it as foccacia or as a rough country loaf rather than as baguettes. Here's a couple of pictures from the bake:



A much more successful project, from my point of view, has been my attempt to create a poilane-style miche. The idea is to reproduce the loaves produced by the late Lionel Polaine, whose signature country-style hearth baked loaf (the miche) is widely regarded as possibly the best loaf in the world.

I've tried a couple of recipes, but I think the one that I liked the best -- and the one that I had most success with, has been the blogger, Shiao Ping's miche in honour of baker, Gerard Rubaud, the aptly named Gerard-Rubaud miche.

There were two things that were interesting to me about this loaf. All of my other breads had used a starter with a fairly high hydration -- generally 100% hydration. Also, I normally just take my starter out of the fridge, give it a quick refresh and I'm baking a few hours later.

The Gerard Rubaud miche, in contrast, uses a firm starter -- akin to the Italian style biga, rather than the more usual sponge type levain. And the starter is a multiple-grain biga, that's built slowly, a little over time, over about three days.

This is not a loaf for the person in a hurry.

You can find the recipe for the loaf linked above on Shiao Ping's blog, but the loaf contains wholewheat flour, rye, spelt and plain flour.

Here's a picture of my first attempt at the Gerard Rubaud miche. It tasted as good as it looked.


My baking hasn't all been plain sailing of late though. I bought a bag of bread flour from Tescos a few weeks ago, and it completely screwed with my baking. I couldn't get a decent loaf out of the whole bag. Every dough I made was overly sticky and never became workable. Every single loaf I made using that bag was inedible and ended up as compost. And what's more, I used it to refresh my starter, so the whole thing infected my motherdough.

I managed to refresh the whole thing out eventually, but the incident completely undermined my confidence in my ability to bake sourdough. I started adding a pinch of quick yeast to my loaves, just to be sure that the dough would be workable and would rise sufficiently.

This weekend, I was discussing my problems with the very helpful guys on Northwest Sourdough on their troubleshooting forum. [Note: the thread has now been moved. You can find it here. Ice and Theresa over there were particularly helpful to me in talking me though the process, and so as I was chatting with them, I decided I'd make a sourdough and post about it in real time. The people over there could give me feedback and we could talk about any issues as they came up.

I didn't need a whole lot of advice, but what I did get was the equivalent of a masterclass in sourdough baking. Firstly, I learned that my hydration calculations were wrong. That explains why my dough was always wetter than I expected it to be.

I also made a breakthrough in terms of my handling the dough -- stretching, folding, degassing, shaping. In the past, I've followed the YouTube videos on the subject, but I never really knew what the dough was supposed to feel like at the various stages. For me, that's been the biggest breakthrough. Everything that I read says that you have to be able to understand who the dough is supposed to feel at any given time. Unless someone actually shows you how to do it with a piece of dough that is good dough though, you've got no point of reference.

However, because I knew that my dough was good, I was finally able to get a handle on how it should feel at every stage. When I finished my loaf, it came out and was unquestionably the best loaf I'd ever baked. Everything about it was absolutely perfect from my point of view. Perfect crust, perfect crumb, great oven spring, fantastic taste. Moist with great keeping capabilities. Here are a couple of pictures:
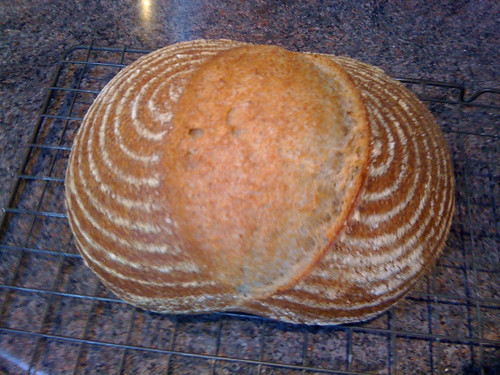


I was shooting for a 64% hydration, but as my calculations were off, I ended up with a 70% hydration dough. In the past, I've not been taken with loaves of such high hydration. They've turned out tough, and ended up making terrible toast. This loaf was the exact opposite though. Tender, moist, perfect with butter and perfect toasted.

Here's a crumb shot:


And it tasted every bit as good as it looked. In fact, I've got one proving as I speak...

Monday, 15 August 2011

Small white sourdough

Small white sourdough by flimbag
Small white sourdough, a photo by flimbag on Flickr.

Experimenting with small loaf sizes and long fermentation. These two had the levain fermenting for 15 hours, and a bulk fermentation in the fridge for about 9 hours, before proving in the bannetons for an additional 2.5 hours.

Pretty loaves, but I haven't tasted them yet. Sainsbury's own brand strong white bread flour.

Monday, 8 August 2011

Better Place sourdough

Better Place sourdough by flimbag
Better Place sourdough, a photo by flimbag on Flickr.

I baked two loaves today.

I made a batch of dough last night, left it in the fridge for an overnight bulk ferment, and then was in too much of a hurry to get it into the oven this morning. Damn thing was underproved, and so it blew out of the bottom, and was undercooked in the middle. Really, just fit for the compost heap.

Of course, I hate not having a proper loaf in the house now, so I whipped up a new one this afternoon. Again, to my own recipe, using my own sourdough starter -- this is definitely the best of all of the loaves that I make. Mostly white, with around 15% rye flour and 5% wholemeal. this loaf has just the right amount of flour and flavour.

Looking in Sainsbury's this afternoon, a 400 gram sourdough (that's OK but not very good) will cost you £1.65. So an 800 gram loaf like this one, would cost about £3.30. It's just flour, water, yeast and salt -- and the yeast comes free!

There's gotta be a decent living if you could make bread as good as this on a large scale. I really like my idea of artisan bakery as a social enterprise. If I get made unemployed any time soon, that's what I'm gonna do.

Sunday, 7 August 2011

Another day, another challah!

Challah, baby! by flimbag
Challah, baby!, a photo by flimbag on Flickr.


Refusing to be defeated, I've decided to have another stab at a challah. This time, I'm going the yeasted (*spit*) route, in the hope that once I've mastered it, I'll go back to sourdough.

Using Peter Reinhart's recipe in Crust and Crumb. He's got a later recipe in one of his later books, but this one is for a single loaf, so I thought that would make it easier (given that I didn't want to use a crate of eggs, a sledge of butter and then have to throw it all out again.

Here's his recipe, along with my commentary:

3½ cups (16 ounces) unbleached bread flour
¼ cup (2 ounces) sugar
1 teaspoon (0.25 ounce) salt
2 teaspoons (0.22 ounce) instant yeast
2 tablespoons (1 ounce) unsalted butter, softened
2 large eggs (3.33 ounces), beaten
2 large egg yolks (1.33 ounces), beaten, plus 1 yolk for egg wash
¼ cup (2 ounces) milk, at room temperature
½ cup water, at room temperature
Poppy or sesame seeds for topping (optional)
Vegetable oil cooking spray.

1. Combine all the dough ingredients in a bowl and mix to a ball.

2. Pour out onto a floured surface and knead for 12 - 15 minutes until the dough is soft, pliable and neutral to the touch. It should be slightly tacky. If necessary, add flour.

Damn thing ate up a pile of flour. I'm pretty sure this is where I went wrong with my last effort. I just followed the recipe exactly, and yeah, it seemed terribly wet so I just used Richard Bertinet's method for working with wet doughs.

When I started with this I had to use Bertinet's method as well. No other way to get it into a kneadable state otherwise. But I kept on adding flour, until I got a sense of it being slightly tacky but workable. It was a long knead -- almost 20 mins, but I think it's probably impossible to over-knead with Bertinet's method.

Eventually, I got something that felt like a bread dough -- as opposed to a cakey type thing. So I went on:

3. Place in a clean, oiled bowl and cover with cling film. Let it rise for an hour -- until it's about doubled in size.

4. Remove the dough from the bowl and knead by hand for another 5 minutes. Re-oil your bowl, pop the dough back in. Re-cover with cling film. Another rising, another hour, another doubling.

So far, so good. Still needs plenty of flour, but it's workable and does behave like dough. Because of all the oils and fat and sugar, you don't want to be working this with your hands for very long because it does get sticky again quickly. Started off with classical kneading, but soon reverted to the Bertinet method again.

5. Divide the dough into three equal pieces (or more if you're making a more complex plait. I'm gonna try the easy one this week to minimize handling). Mist with cooking oil, cover and allow to rest for 20 mins.

6. Working quickly, roll the pieces into eight inch long cigar shapes -- fatter in the middle, thinner on the ends. Cover each piece as you finish working it.

7. Once you've got your plaits, lay them side by side on a floured surface. Plait the loaf. I'll link to a YouTube video to show how this is done.

8. Put the loaf on a baking sheet that's been lined with baking parchment. Beat a single egg yolk. Use half the beaten egg to glaze the plait. Cover with cling film or a towel and let it rise for another hour or until doubled in size.

Still looking good. I prefer the other method of creating the plaits, in which you roll them out with a rolling pin and then roll them up. It seemed easier to work with them that way. I managed to get the thing plaited up, but it kept expanding as I kept plaiting.

Challah #2 - final prove by flimbag


9. Pop a shelf in the middle and preheat your oven to 190c -- 180c if you're using a fan assisted jobby as I am.

10. Use the rest of the egg yolk to glaze the loaf again. If you're using poppy seeds, now is the time to put them on.

11. Slap the thing in the oven for about 45 mins, turning half way through for even browning. Loaf wants to be about 85c in the centre when cooked. Or, you know, whack it on the bottom and hope it sounds challahw.

Gone into the oven now. This one had definitely doubled in size before it went into the oven -- unlike my previous sourdough attempt, which had just stopped by that point. Gonna be interesting to see how much oven spring I get, but so far, everything followed the recipe, as you'd expect.

12. Get it out, slap it on a rack. Let it cool for an hour. Voila! Or not?

Whoa! Just checked it out after 15 mins and the damn thing is a monster! A challah the the size of a three year old kid! It's a little dark already, so I've turned the heat down, but it's impressive so far.

I'm done. Final pic at the top of the page. Looks like a winner!


Thursday, 4 August 2011

Spelt sourdough

Spelt sourdough by flimbag
Spelt sourdough, a photo by flimbag on Flickr.

This was a peculiar stuff to work with. That challah recipe claimed it would feel like modelling clay to work with. It didn't.

This 20% spelt dough, on the other hand, felt just like modelling clay. I'd left the shaped loaf in the fridge for a long overnight prove, and when I got to it in the morning, I could see big air bubbles appearing before my eyes, just below the skin of the loaf.

Then, when I tried to slash the loaf, I began to see just how wet the dough was below the skin. I started to lose control of my loaf during the slashing, so I gave up before I'd finished and slammed it in the oven.

It seemed to behave fine once it was in the oven. Completely predictable. I've just taken it out, so I've no idea what the flavour or the crumb are like. I made this one 20% spelt, 80% white so I could get some sense of what the spelt flavour was like, without producing a heavy, inedible loaf. I've seen pictures of 100% spelt loaves and they don't look that appetizing.

This one does look appetizing -- albeit somewhat lopsided. I'll post more when I've cut it and know about the crumb and the flavour.

On tasting, I found this a bit disappointing. Perhaps it's because spelt is an acquired taste, but I didn't find it an improvement on either my white loaves or my wholemeal loaves. Also, the loaf seemed to dry out and stale very rapidly, which was a surprise because I didn't bake it especially long or hot.

I'll try spelt again -- perhaps with wholemeal or rye -- but I'm not holding out a lot of hope for it. Obviously, there's a reason we use the flour we use most -- it's tastiest. Unless you've got some kind of gluten allergy, I don't see any reason to be messing with this stuff.

WTF?

WTF? by flimbag
WTF?, a photo by flimbag on Flickr.

Did an overnight prove in the fridge yesterday and this is what I ended up with...

Not sure what went wrong here. The loaf was inside a plastic bag that was sealed, but it looks as though all of the moisture has leaked out of the outer half-inch of loaf or so.

Haven't cut into it yet, but there was virtually no oven spring or increase in size once the thing went into the oven. Could I have over-proved it?