I suspect that many of my problems in the past have been a consequence of inaccuracy around my hydration levels. I'd been relying on one of the many on-line calculators. Maybe it worked and it was just me being careless? Maybe it was rubbish? And I don't think I ever used the same calculator twice.
Last week though, I discovered what I feel to be the best of all the online calculators for doing hydration levels. It's simple. It's graphic, so it's easy to read and to use. Here's a link. Have a little play around with it.
Anyway, having nailed my hydration level issue, there were a couple of other issues that needed nailing. Shaping, and adequate proofing times.
In the past, I'd simply go by what the recipe said. If it told me to bulk ferment for two and a half hours, that would be what the loaf would get. Yes, they always said that you have to go by how the dough feels -- but unless you know what proper dough feels like at the various stages, you're just kinda guessing.
And it shows in the loaf.
Looking back, I can see that my sourdough loaves have always been a bit underproved, a bit underdeveloped. Well, sometimes it was a bit -- and sometimes it was a lot.
The loaves were edible. They tasted great. But the crumb was *really* tough -- even when the loaf had risen enough.
I wasn't getting enough air in. The bulk ferment wasn't right. The proving wasn't right. The shaping wasn't right either. Hang on a sec:
Formula
Kneading
Bulk ferment
Proving
Shaping
That's just about *everything* that needed improving...
OK, lets take it from the top, and I'll use the loaf I baked last night as an example.
As I said, the recipe I was using was based on Shiao Ping's Gerard Rubaud Miche. I didn't need such a humungous loaf though, and I didn't have the three days to buld her biga-like starter, so I just wanted to whack it out using the starter I had in my fridge -- which was nice and ripe, but was 100% hydration.
So the recipe went:
150g ripe sourdough starter
292g water
90g wholewheat flour
40g spelt flour
14g rye flour
322g white flour
Mix the starter and the water together, and then add the various flours.When they're well mixed, cover the bowl for 25 mins to let the dough autolyse -- then add your 10g salt and start kneading the dough.
I know people say that you don't need to knead after autolysing. Personally, I've tried it both ways, and it comes out better with kneading. I give it about 10 mins using the Bertinet Method of kneading. Then, I make a ball, oil my glass mixing bowl, slap it it in and cover it with cling film.
I don't know if the style is crucial, but I think that it's crucial that you do them. It seems to really help in developing the gluten and getting a good, solid skin when you shape your dough later.
So, I do four lots of stretch and folds doing a set after 30 minutes. After my final set, I leave the dough alone until it doubles in size. I'm checking the sides of my glass bowl to make sure that I've got good, even aeration throughout the dough. If I've got both of these things -- which generally takes between an hour and a half to two hours, *after* my last set of stretch and folds -- then I'm ready to get my dough out of the bowl and stat shaping.
Shaping is something that I struggled with in the past as well, but that was because I wasn't giving my dough enough time to develop. Once I had, the whole thing became much easier to work with. So, I'd form a boule. Let it rest on the counter for five minutes. De-gas and flatten into a circle, then reshape into a boule for the second time. Another five minute rest. Then, do your second shaping.
There are a whole pile of YouTube videos that demonstrate shaping a boule. As long as your dough is sufficiently matured, theu're all good. Here, check it out. Reinhart again:
Once you've got your shaped boule, slap it into the Banneton to prove.
In the past, I was giving my loaves around an hour or an hour and a half to prove. That seemed right. It was what the recipe generally said. If you went by the size of the dough ball that I began with after mixing my dough, it was definitely double that size. And wouldn't the oven spring take care of any additional growth?
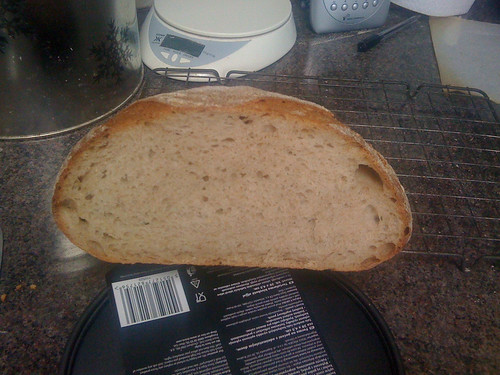
If you scroll back in my blog, you can see what my earlier loaves look like. As I said, they weren't bad. They tasted good. But some were better than others. I didn't have any consistency. Now, I believe I've cracked that. Check the loaf that I posted in my previous blog entry. And now check this one:

So now, I feel like I can move on to bake other breads having finally mastered the fundamentals of sourdough.